The Science of Seeing: Why Your Off-Road Lighting Pattern Matters More Than Lumens
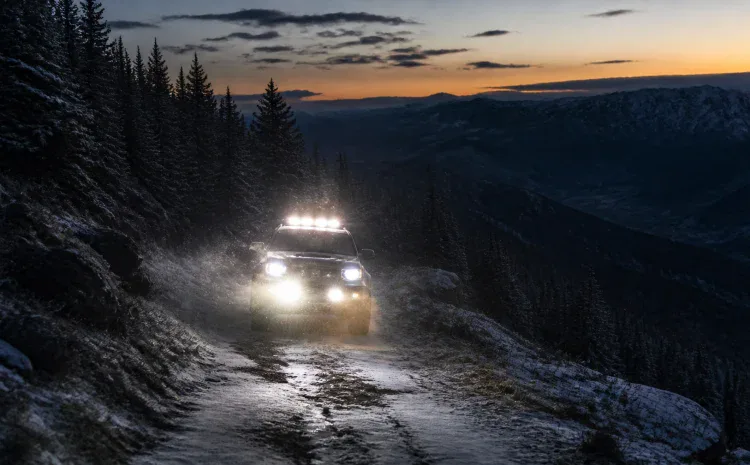
We’ve all seen that one rig on the trail. You know the one: it’s got a 50-inch light bar on the roof, four pods on the A-pillars, and maybe a few more stuffed into the grill. It looks like a rolling sun, but as soon as the driver hits a patch of Montana dust or a late-season snowstorm near Hamilton, they’re practically blind. All that raw power is bouncing right back into their eyes, creating a “white wall” of glare that makes it harder to see the trail than if they just stayed with the stock headlights.
In the world of off-road lighting, “lumens” is the buzzword everyone loves to throw around. It’s the number on the box that tells you how much total light the unit produces. But here’s the truth: lumens don’t tell you where that light is actually going. For drivers in Western Montana, having 50,000 lumens is useless if those photons are hitting your hood or reflecting off a snowflake six inches from your windshield.
At Way Maker Offroad, we focus on the science of seeing. It’s not about how much light you have; it’s about how that light is managed. Understanding beam patterns: Spot, Flood, Driving, and Scene: is the difference between a rig that looks cool in a parking lot and a rig that safely navigates the Bitterroot National Forest at midnight.
Lumens vs. Lux: Quality Over Quantity
Before we dive into patterns, we need to clear up the “lumen lie.” Lumens measure the total amount of light emitted by a source in every direction. Think of it like a bucket of water. If you throw that bucket of water into the air, you have a lot of water, but it’s not doing much work.
Lux, on the other hand, measures how much of that light actually hits a specific surface. If you put that same bucket of water into a high-pressure hose, you can direct it exactly where you need it. In the same way, a high-quality light with lower lumens but superior optics will often “out-throw” a cheap, high-lumen light bar because it focuses the light where it belongs. When you’re looking for overlanding gear and accessories, you want to look at the optics, not just the sticker on the box.
Breaking Down the Patterns
Choosing the right light is about building a “lighting zone” strategy. Different patterns serve different purposes, and a well-built rig uses a combination of them.
The Spot Beam: Your Long-Range Sniper
A spot beam is a narrow, concentrated beam of light (usually between 8° and 20°). Its job is simple: throw light as far down the trail as possible. This is essential for higher-speed driving where you need to see obstacles far enough in advance to react.
However, in Western Montana, a spot beam can be your worst enemy in the winter. Because the light is so concentrated, it hits falling snow or heavy dust like a laser, reflecting back and blinding you. Spots should almost always be mounted low and used only when the air is clear.
The Flood Beam: Room to Breathe
Flood beams offer a much wider spread (40° to 60°) but significantly less distance. These are designed to illuminate the immediate area around your vehicle. They are great for technical rock crawling or navigating tight, winding trails where you need to see what’s just off to the side of your fenders.
The Driving Beam: The Gold Standard
If you’re only going to add one set of auxiliary lights to your truck or Jeep, make it a driving beam. These are designed to supplement your high beams, offering a mix of distance and width. A good driving beam is often flattened horizontally, which provides excellent visibility on the trail surface without wasting light by throwing it into the trees or sky. This is a staple of any professional off road lighting installation.
Scene Lighting: The Camp Companion
Scene lights aren’t for driving; they are for everything else. With a massive 120° spread, they provide even, edge-to-edge illumination with no “hot spots.” These are perfect for setting up camp, performing a trailside recovery, or lighting up a work area.

The Montana Factor: Dust, Snow, and Amber
Living in Western Montana means we deal with conditions that drivers in the desert never have to worry about. When the snow starts dumping or the dust kicks up on a dry summer trail, white light is often the wrong tool for the job.
White light has a shorter wavelength, which means it scatters more easily when it hits particles in the air (like snow, dust, or fog). This is why your high beams make it harder to see in a blizzard.
Amber or “Selective Yellow” lighting has a longer wavelength that doesn’t scatter as easily. By switching to amber pods for your fog or “wide cornering” lights, you “cut” through the debris rather than reflecting off it. At Way Maker Offroad, we often recommend a “dual-control” setup for our western montana 4×4 service clients: white lights for clear nights and amber lights for when the weather turns south.
Mounting Matters: Why Height Isn’t Always Better
A common mistake we see is mounting everything on the roof. While a roof-mounted light bar gives you a great perspective on the terrain, it has one major flaw: it illuminates your hood. This creates a massive amount of glare right in your field of vision.
In heavy snow or dust, a roof bar is often the first thing you’ll want to turn off. For the best visibility in poor conditions, you want your lights mounted low: on the bumper or in the factory fog light pockets. This puts the light below your line of sight, allowing you to see “under” the fog or snow rather than trying to look through it.
Don’t Let Your Wiring Be the Weak Link
Adding high-performance lighting adds a significant load to your vehicle’s electrical system. It’s not just about bolting the lights on; it’s about ensuring they have the power they need to perform.
Cheap wiring harnesses can lead to voltage drops, meaning your expensive lights aren’t even hitting their rated output. Even worse, poor wiring is a fire hazard on the trail. Professional installation ensures that every light is properly fused, relayed, and switched, giving you a reliable system you can trust when you’re miles from the nearest paved road.
Conclusion: Build a System, Not Just a Collection
Getting your lighting right isn’t about buying the biggest bar you can find. It’s about understanding the environment you drive in and selecting the tools that work for those conditions. Whether you’re navigating a technical climb near Missoula or heading out for a weekend of overlanding in the backcountry, the right mix of beam patterns will keep you moving safely.
At Way Maker Offroad, we don’t just sell parts; we build rigs that work. We’ve spent over 30 years in the industry, and we know exactly what it takes to make a vehicle “Montana-proof.” If you’re ready to stop guessing and start seeing, come see us for a professional lighting consultation.
Ready to Light Up the Trail?
Don’t settle for “bright enough.” Let the experts at Way Maker Offroad help you design a lighting system that actually works when you need it most. From high-performance LED pods to custom wiring and installation, we have the gear and the experience to get it done right.
Contact Way Maker Offroad today to schedule your lighting upgrade or stop by the shop to see our selection of overlanding gear.